

Search

Red Velvet Squares

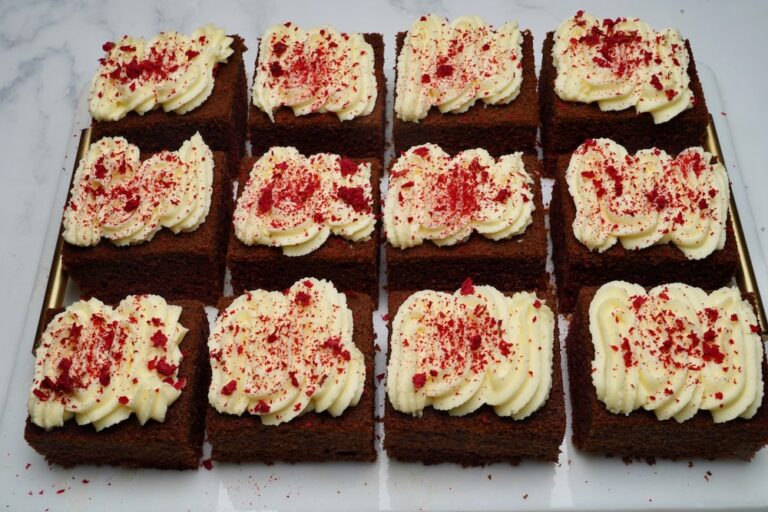
Soft red velvet squares topped with cream cheese and mascarpone icing — simple to make, and always a hit.
PREP TIME
25 minutes
COOK TIME
30-35 minutes
SERVES
12-16 squares

About this recipe

There’s something about red velvet that always feels a little romantic — I’m still not quite sure what it is, maybe the deep colour, maybe the way it always shows up at the celebrations that matter, but these red velvet squares have quickly become one of my favourite ways to bake it. Instead of the usual layered cake, I’ve turned it into a rectangular tray of soft, cocoa-red squares, each one topped with a swirl of whipped cream cheese and mascarpone icing.

My nephew has red velvet down as his absolute favourite, and since he’s allergic to nuts, this is one dessert I know he can always dig into without a second thought. That said, I honestly think red velvet is one of those recipes everyone should have in their back pocket — it’s simple enough for a weeknight bake, but special enough for a birthday table or a dessert spread for guests.

If you love a make-ahead tray bake as much as I do, you’ll probably also enjoy my no-bake Black Forest cakes — another dessert built for chilling ahead and pulling straight from the fridge when you need it. These red velvet squares follow that same easy, prep-ahead spirit, just baked in cake form.

ADVERTISEMENT

Ingredients

For the red velvet cake

  • 450 grams plain flour
  • 50 grams cornflour
  • 25 grams cocoa powder
  • 20 grams baking powder
  • 10 grams baking soda
  • 1 teaspoon salt
  • 150 grams unsalted butter
  • 400 grams caster sugar
  • 4 large eggs, room temperature
  • 200 grams vegetable oil
  • 250 grams buttermilk, room temperature
  • 3 teaspoons vanilla extract
  • 2-3 tablespoons red food colouring ( how red do you want it)
  • 3 teaspoons vinegar

For the icing

  • 250 grams cream cheese
  • 250 grams mascarpone
  • 1 teaspoon vanilla extract
  • 120 grams icing sugar
  • 400 grams double cream

Notes from Rouba

  • I dust the pan with a little cocoa powder instead of flour, so the crumb stays dark right to the edges
  • I cut the squares first, then swirl the icing onto each one individually — it keeps the edges neat
  • These are nut-free, so they’re an easy one to put out when you’ve got guests with allergies

Method

Step 1. Mix the Dry Ingredients

Preheat the oven to 160°C (fan-forced) (180°C conventional) (350°F) and butter a 23×33cm rectangular pan, dusting it with a little cocoa powder so the finished edges stay dark.

In a large bowl, whisk together the plain flour, cornflour, cocoa powder, baking powder, baking soda and salt. Set aside.

Step 2. Make the Batter

In a separate large bowl, beat the unsalted butter and caster sugar together until pale and fluffy, about 3–4 minutes. Add the eggs one at a time, beating well after each addition, then mix in the vanilla extract and red food colouring until fully combined and evenly coloured. In a small jug, whisk the vegetable oil into the buttermilk until combined. With the mixer on low, add the dry ingredients to the butter mixture followed by the buttermilk mixture — mix just until combined. Do not overmix so the crumb stays tender. Fold through the vinegar right at the end, just before pouring into the pan.

Step 3. Bake and Cool

Pour the batter into the prepared pan and smooth the top level. Bake for 45–50 minutes, until a skewer inserted into the centre comes out clean. Cool the cake in the pan for 15 minutes, then turn it out onto a wire rack to cool completely.

Step 4. Ice and Assemble

Beat the cream cheese, mascarpone, vanilla extract and icing sugar together until smooth, then add the double cream and whisk until thick, light and fully combined. Once the cake has cooled and chilled, cut it into squares, then top each one with a generous swirl of icing just before serving.
A FEW THINGS YOU'LL WANT TO KNOW

Can I make these ahead of time?
Yes, and I'd actually recommend it — bake the cake a day ahead and keep it wrapped in plastic or in an airtight container at room temperature, no need to chill it. Ice the squares closer to when you're serving them so the icing stays fresh and holds its swirl.

Why did my cake sink in the middle?
This usually comes down to a bit too much rise happening at once, the oven door being opened too early, or simply an underbaked centre — that last one is the most common culprit, so give it the full bake time and check with a skewer in a couple of spots, not just the centre, before pulling it out.

Can I make the icing ahead of time?
Yes — it keeps well in the fridge for up to five days. Just bring it out to room temperature and give it a good whisk by hand before using, so it comes back to that thick, light consistency.

Can I use buttercream instead of the whipped icing?
You can — a cream cheese buttercream will hold its shape for longer at room temperature and pipe with neater edges, if you're serving these somewhere warm or need them to sit out for a while.

Is this recipe nut-free?
Yes — nothing in the cake or the icing contains nuts, which makes this one I can always put out without worrying about who can and can't eat it.

What's the difference between gel and other red food colouring?
Gel colouring is much more concentrated than liquid, so you get a deep, true red without adding extra liquid to the batter. Liquid colouring needs a lot more to get the same depth of colour, Either works, but how much you use really comes down to how red you want the cake — start with less and add more until you're happy with the colour.

Why don't you beat the oil in with the butter and sugar?
Butter is solid, so creaming it with sugar traps tiny pockets of air, which is what gives the cake its lift and structure. Oil doesn't have anything for the sugar to catch onto, so beating it in at that stage won't add any lift — it just thins out the butter and takes away from what the creaming is doing for you. That's why the oil goes in separately, mixed through the buttermilk instead, where its job is to keep the crumb moist rather than help it rise.

Why does the oil separate a bit when I whisk it into the buttermilk?
A little separation is completely normal — oil and buttermilk don't fully blend the way two water- based liquids would, since one's fat and the other's mostly water. You're not aiming for a perfectly stable mixture, just an even distribution so the oil doesn't pool in one spot once it's in the batter. As long as you whisk it together and add it to the batter fairly quickly, it works fine.

I've seen others use sour cream instead of buttermilk — can I do that here?
You can, but it'll change the texture a little. Buttermilk's tang is what reacts with the baking soda for lift, so swapping it out entirely can make the rise less reliable. Sour cream is thicker and richer, so it's better used alongside the buttermilk rather than instead of it — that's what gives you a denser, more velvety crumb without losing the lift buttermilk provides


Red Velvet Squares

Prep Time 25 minutes
Cook Time 35 minutes
Servings: 16 squares

Ingredients
  

For the red velvet cake
  • 450 grams plain flour
  • 50 grams cornflour
  • 25 grams cocoa powder
  • 20 grams baking powder
  • 10 grams baking soda
  • 1 teaspoon salt
  • 150 grams unsalted butter
  • 400 grams caster sugar
  • 4 large eggs room temperature
  • 200 grams vegetable oil
  • 250 grams buttermilk room temperature
  • 3 teaspoons vanilla extract
  • 2 tablespoons red food colouring
  • 3 teaspoons vinegar
For the icing
  • 250 grams cream cheese
  • 250 grams mascarpone
  • 1 teaspoon vanilla extract
  • 120 grams icing sugar
  • 400 grams double cream

Method
 

Step 1. Mix the Dry Ingredients
  1. Preheat the oven to 160°C (fan-forced) (180°C conventional) (350°F) and butter a 23×33cm rectangular pan, dusting it with a little cocoa powder so the finished edges stay dark.
  2. In a large bowl, whisk together the plain flour, cornflour, cocoa powder, baking powder, baking soda and salt. Set aside.
Step 2. Make the Batter
  1. In a separate large bowl, beat the unsalted butter and caster sugar together until pale and fluffy, about 3–4 minutes. Add the eggs one at a time, beating well after each addition, then mix in the vanilla extract and red food colouring until fully combined and evenly coloured. In a small jug, whisk the vegetable oil into the buttermilk until combined. With the mixer on low, add the dry
  2. ingredients to the butter mixture followed by the buttermilk mixture — mix just until combined. Do not overmix so the crumb stays tender. Fold through the vinegar right at the end, just before pouring into the pan.
Step 3. Bake and Cool
  1. Pour the batter into the prepared pan and smooth the top level. Bake for 45–50 minutes, until a skewer inserted into the centre comes out clean. Cool the cake in the pan for 15 minutes, then turn it out onto a wire rack to cool completely.
Step 4. Ice and Assemble
  1. Beat the cream cheese, mascarpone, vanilla extract and icing sugar together until smooth, then add the double cream and whisk until thick, light and fully combined. Once the cake has cooled and chilled, cut it into squares, then top each one with a generous swirl of icing just before serving.
Sahtan - Enjoy in Good Health

What do you think?

0/5 (0 Reviews)

Share the love!

Leave a Reply

Your email address will not be published. Required fields are marked *

Creating magic and happy memories with food are my gift for you!
xx Rouba

Latest Recipes

Red Velvet Squares

Soft red velvet squares topped with cream cheese and mascarpone icing — simple to make, and always a hit.